Search
Booking List
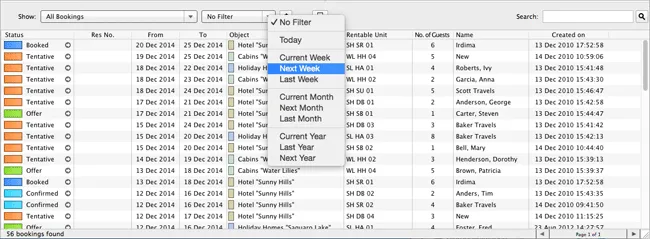
The booking list shows all bookings from the reservation schedule. You can sort the list by its columns.
Note:
After you’ve made changes in the schedule you might have to update the list by clicking on the update button: ![]()
By double-clicking on a row you can open the booking window. You can also open the booking window by using the context menu.
By clicking the arrow symbol in the status column ![]() you can quickly go to a certain booking in the reservation schedule. The booking will be selected (shown with a bold black border around it) and the reservation schedule will adjust itself.
you can quickly go to a certain booking in the reservation schedule. The booking will be selected (shown with a bold black border around it) and the reservation schedule will adjust itself.
In the upper right corner of the booking list you’ll find a search form that allows you to search through all the booking data. The search also extends to the guest information linked to the bookings.
If you want to print this list, press the print button: ![]() .
.
Note:
Reservation numbers are given automatically to bookings that come from the online booking system. Bookings that have been made in Lodgit Desk itself cannot be given a reservation number.
Preset selections for your most important tasks
There is a selection menu that allows you to filter the booking list:
All Online Bookings:
All bookings that were received via online synchronisation are shown. The submenu offers you the possibility to differentiate between online bookings received from the Lodgit online system or the channel manager.
New Online Bookings:
Only the online bookings that were synchronised with the last synchronisation are being shown. A submenu also offers you the possibility to show only online bookings received through the Lodgit online system or the channel-manager.
Bookings without rentable unit:
This will list all online bookings that could not be directly added to a unit (e.g. because no single unit was vacant for the entire time frame). You can open the booking by double-clicking on the list entry and using the rentable unit drop down in the booking window to move the booking into the reservation schedule.
Offers – expired:
The booking list will only show bookings that have expired offers attached to them. Whenever a booking receives the status “confirmed” or higher, it will be no longer shown in the list (you may have to update the list).
Return Confirmations – expired:
This will only show bookings that were expecting a return confirmation but they are now expired. Whenever a booking is set to the status “confirmed” or higher it will no longer be shown in that list. You may have to update the list to see the changes.
Deposits – not yet billed:
This will only show bookings that have not yet billed a deposit.
Deposits – not yet received:
The booking list will only show bookings with deposit invoices that have not been set to “paid” yet.
Services – not yet billed:
This option will only show bookings that still have un-billed items. When the booking does not have any un-billed items anymore, it won’t be shown in the list any longer. You might have to update the list to see the changes.
Invoices – not yet paid
This will show all bookings that are still unpaid. Once the invoice is marked as paid, the booking will no longer be shown in the list. You may have to update the list to see the changes.
Invoices – term of payment exceeded:
This will show all bookings that are unpaid after the due date has passed.
Double Bookings:
This will only show current over-bookings. Those are bookings in the present or future that are booked in the same unit with overlapping time frames.
In addition to that, you can also filter the list to only show a certain term, e.g. “Today” or “Next Year”. Using this filter will only display bookings whose booking time frame fulfils the criteria.